Safe, sturdy, attractive and functional buildings are a crucial part of every community. Architects apply their skills toward designing these structures so that people can live, work and enjoy themselves in healthy, surroundings. While competition for architecture jobs poses real challenges for new graduates, those who are able to find work can expect to earn a higher-than-average salary as they achieve more experience.
Job Description
Architects design buildings and structures, including houses, office complexes, commercial spaces and sporting venues. An architect may be deeply involved with a construction process from start to finish. For example, an architect may work with a client to develop project goals, design the project, and be part of the team that hires contractors and supervises the project's construction.
Educational Requirements
All states regulate the practice of architecture. According to the U.S. Department of Labor's Bureau of Labor Statistics, architects need to hold at least a bachelor's degree in architecture, although many go on to earn master's degrees. All states require aspiring architects to complete at least a three-year internship before they can sit for the Architect Registration Examination. After passing the exam, the aspiring architect can apply for licensure in the state where he wants to work.
According to the BLS, 35 states require architects to graduate from a bachelor's degree program that has been accredited by the National Architectural Accrediting Board. Before applying to a school, check to make sure that its architecture program holds this accreditation.
According to the BLS, the median architect salary was $76,930 as of May 2016. This means that 50 percent of architects made more than this amount, while the other half made less. According to a survey by PayScale.com, architects with less than five years of experience made a median salary of $51,000 per year.
Industry
Most architects work from either commercial or home offices. However, an architect can expect to spend time on the road meeting with clients and visiting construction sites. Most architects work full time and may have to work day and evening hours to meet project deadlines. The BLS notes that architectural projects are connected to fluctuations in the construction industry. This means that factors affecting construction, including weather, labor issues and the economy, also affect work availability for architects.
In some states, architects can legally perform home inspections without having to obtain a separate home inspection license. Some architects supplement their incomes by doing home inspections between projects.
years of Experience
Architects can expect to earn more as they gain experience in their field. A survey by PayScale.com shows the correlation between income and years on the job for architects:
0-5 years: $51,000
5-10 years: $65,000
10-20 years: $75,000
20+ years: $95,000
Job Growth Trend
The BLS projects that the number of architecture jobs will increase by 4 percent between 2016 and 2026. This slower-than-average job growth indicates that there will be heavy competition for available jobs. There is a trend toward increased awareness of environmentally sound architecture, so those architects who are proficient in green design may have an easier time finding jobs.
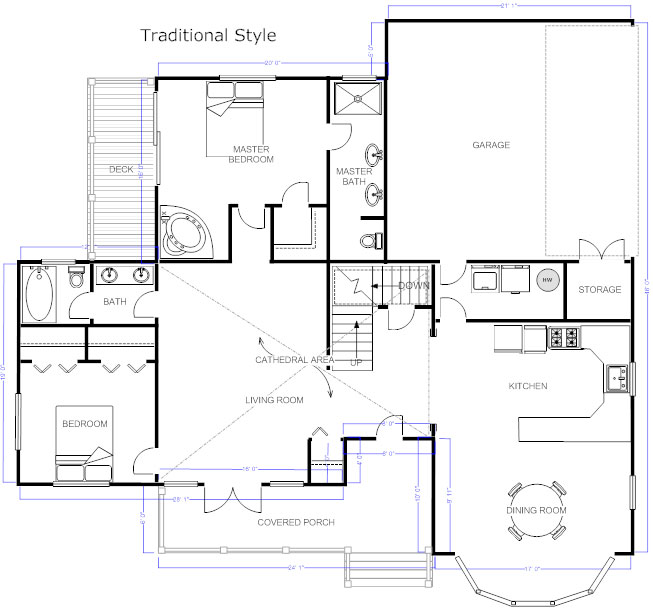
A floor plan is a scaled diagram of a room or building viewed from above. The floor plan may depict an entire building, one floor of a building, or a single room. It may also include measurements, furniture, appliances, or anything else necessary to the purpose of the plan.
Floor plans are useful to help design furniture layout, wiring systems, and much more. They're also a valuable tool for real estate agents and leasing companies in helping sell or rent out a space.
The Importance of Floor Plan Design
Floor plans are essential when designing and building a home. A good floor plan can increase the enjoyment of the home by creating a nice flow between spaces and can even increase its resale value.
What are the key characteristics of a good floor plan when designing your house?
Versatile and flexible. Make sure in the future an office can easily be turned into a child's bedroom whether for your family or a future buyer's.
Ideal room layout. Make sure bedrooms are far from entertaining spaces. Bathrooms shouldn't face common entertainment spaces like dining rooms or living rooms. Most people will like if the kitchen opens to the dining or living rooms so whoever is cooking can still interact with guests or keep an eye on the kids playing.
Size matters. Whenever designing any room or hallway, think about how many people will be in that space at one time. Do they have room to move around? Is there room for furniture to accommodate all the planned activities?
Fits your priorities and lifestyle. If entertaining is important, make sure there's a good flow from the kitchen to an outside space and living room. If you work from home, make sure your office gets ideal light and is perhaps in a quiet location. When you do laundry, is it ok if you have to climb three floors to get from your master bedroom to the laundry room?
Find the balance between architectural details and practical considerations. Think about the safety of kids, cleaning, heating and cooling bill before falling in love with some majestic staircase or floor to ceiling windows.
Marketing and communicating with floor plans
Floor plans are also key in communicating the flow of your space to potential buyers or renters.
Rightmove released a study in 2013 that suggests that real estate buyers consider floor plans not just nice to have, but essential when looking at properties. One in five said they would ignore a property without a floor plan. They also rated floor plans more important than photos and the description of the property. On the flip side, when sellers consider hiring a real estate agent, Rightmove found that 42% wouldn't hire an agent that didn't offer a floor plan.
Adding a floor plan to a real estate listing can increase click-throughs from buyers by 52%.
You can also use a floor plan to communicate with contractors and vendors about an upcoming remodeling project.
How to Draw a Floor Plan
There are a few basic steps to creating a floor plan:
Choose an area. Determine the area to be drawn. If the building already exists, decide how much (a room, a floor, or the entire building) of it to draw. If the building does not yet exist, brainstorm designs based on the size and shape of the location on which to build.
Take measurements. If the building exists, measure the walls, doors, and pertinent furniture so that the floor plan will be accurate. If the layout is being created for an entirely new area, be sure that the total area will fit where it is to be built. It is advisable to examine buildings built in similar areas to use as an estimate for this floor plan.
Draw walls. Add walls for each room of the building, taking care to draw them to scale.
Add architectural features. Begin adding features to the space by including the unchangeable things, like the doors and windows, as well as the refrigerator, dishwasher, dryer, and other important appliances that must be placed in a specific location.
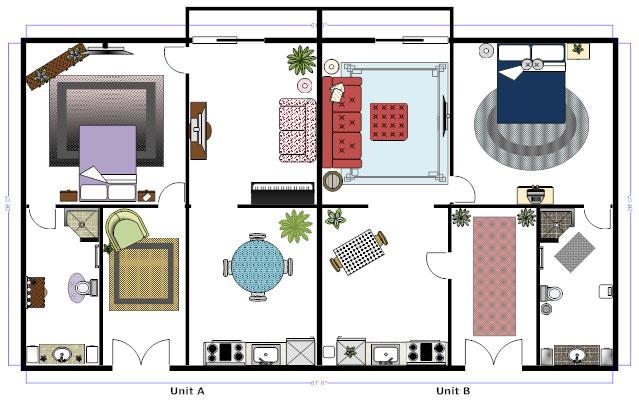
Add furniture. Add furniture if the floor plan calls for it.
So, what is interior architecture? There’s some debate around the distinction between the terms architecture, interior architecture, interior design, and interior decoration.
This is because of the blurred lines between the responsibilities of each profession – where does the interior design of a space end and architecture begin, and vice versa?
What’s the difference between Interior Architecture and Interior Design?
Many things have increased the confusion between these titles in recent years – including the improvement of interior design education.
A lot of interior designers have become more involved with technical and architectural aspects of interior design (and less involved with the decorative side).
As a result, many interior design degree courses have been renamed as interior architecture degrees to more accurately reflect the course content.
Courses like this have also grown in popularity – producing a growing number of architecturally-savvy designers.
What is Interior Architecture?
Strictly speaking, interior architecture is a subject rather than a profession. The term ‘architect’ is protected (like ‘doctor’) and can’t be used by anyone without the specific qualifications and accreditation.
Interior architecture as a term has come into use due to the increasing scope and responsibilities of interior designers – largely thanks to improvements in design technology (CAD) and interior design education.
Many degree courses now teach students about the structural technical elements of buildings, which has begun to blur the line between architecture and interior design.
What is Interior Decoration?
Interior decorators are concerned with the aesthetics of the building (colour schemes, furniture, art work etc.).
They’re involved with the art side of design, and less with the science. Interior decorators will have no concern with the structural design of the building and are not required to be as knowledgable about building regulations.
Interior decorators won’t usually need to be involved from the start of the build and won’t need to have in-depth knowledge of technical elements like CAD and structural design.
They must, however, be very artistic and have an eye for interior design trends and aesthetic detail.
All interior designers, even those trained as interior architects, should be skilled in the art of interior decoration in order to complete their job properly.
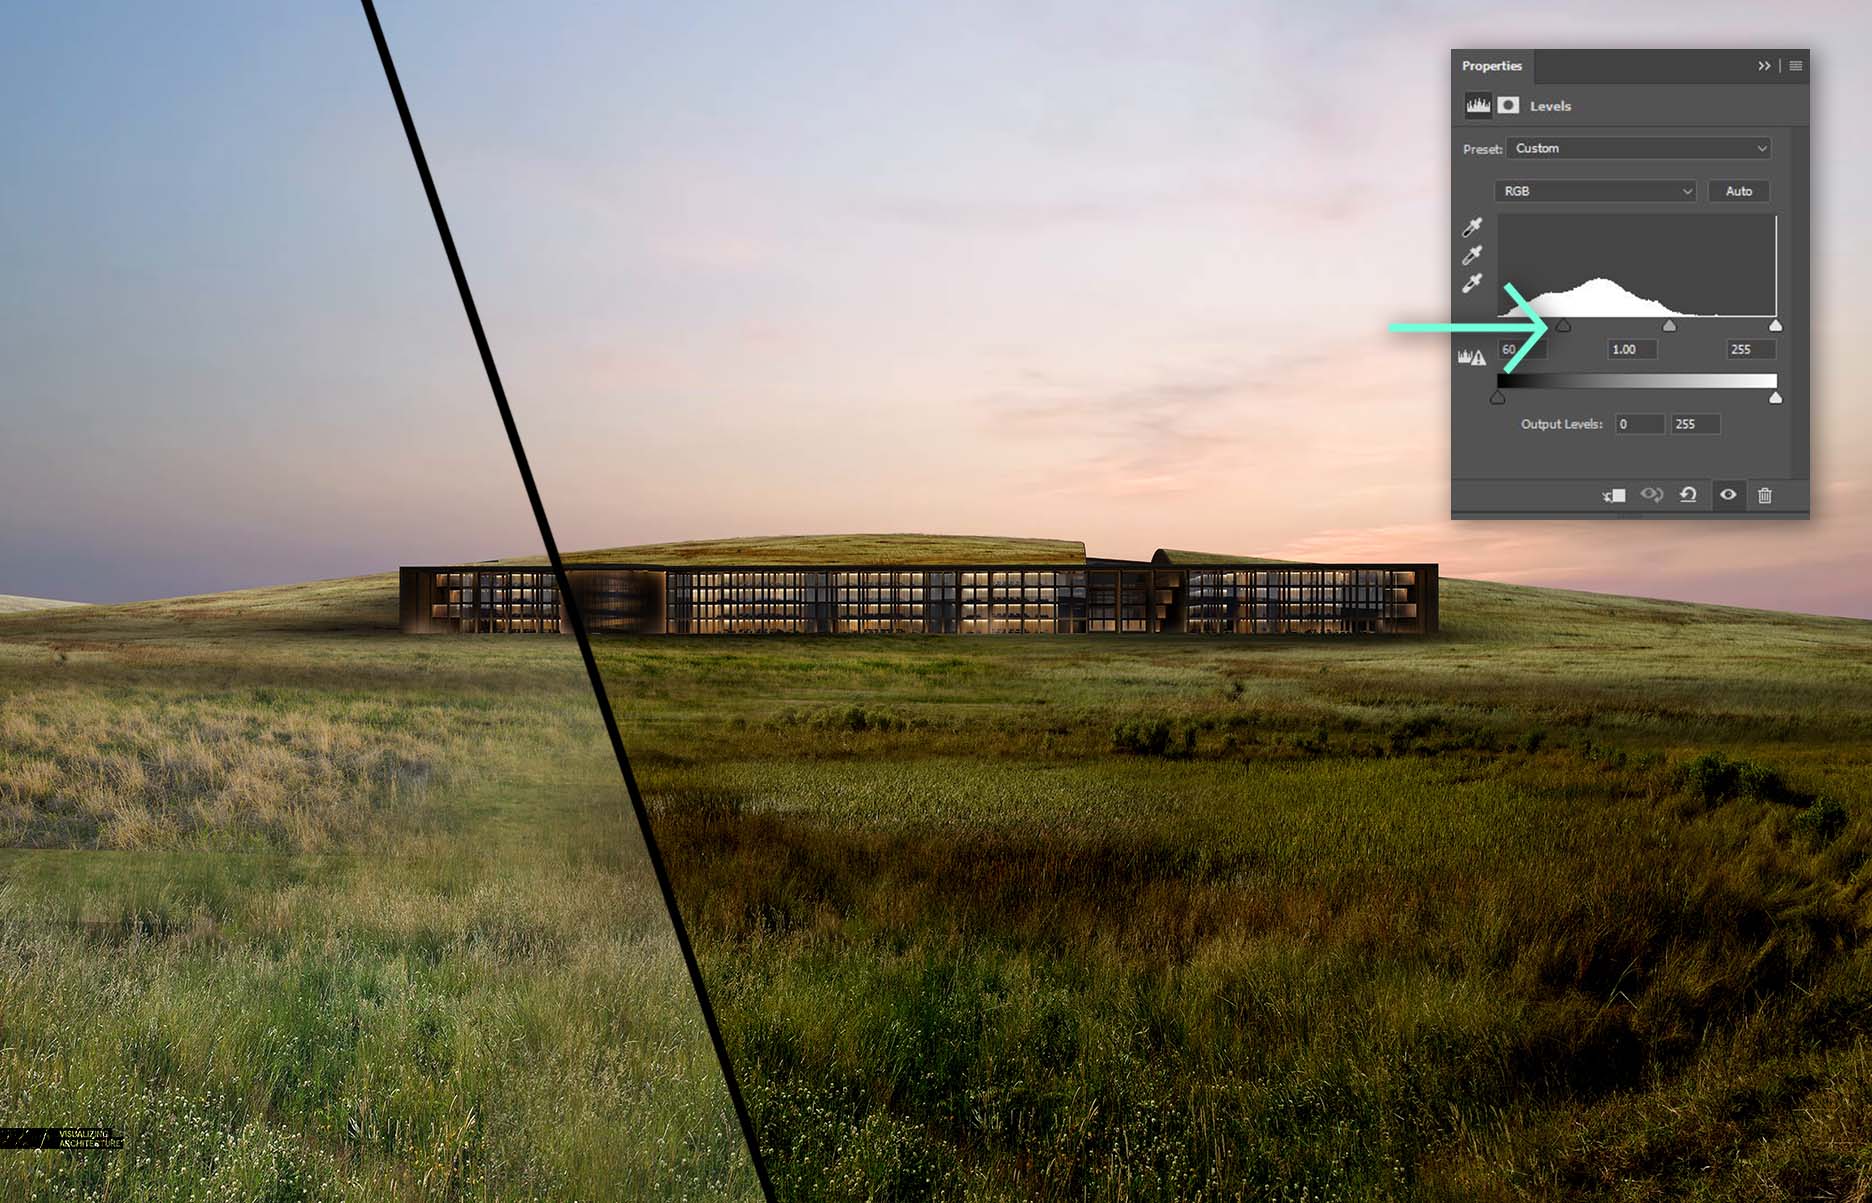
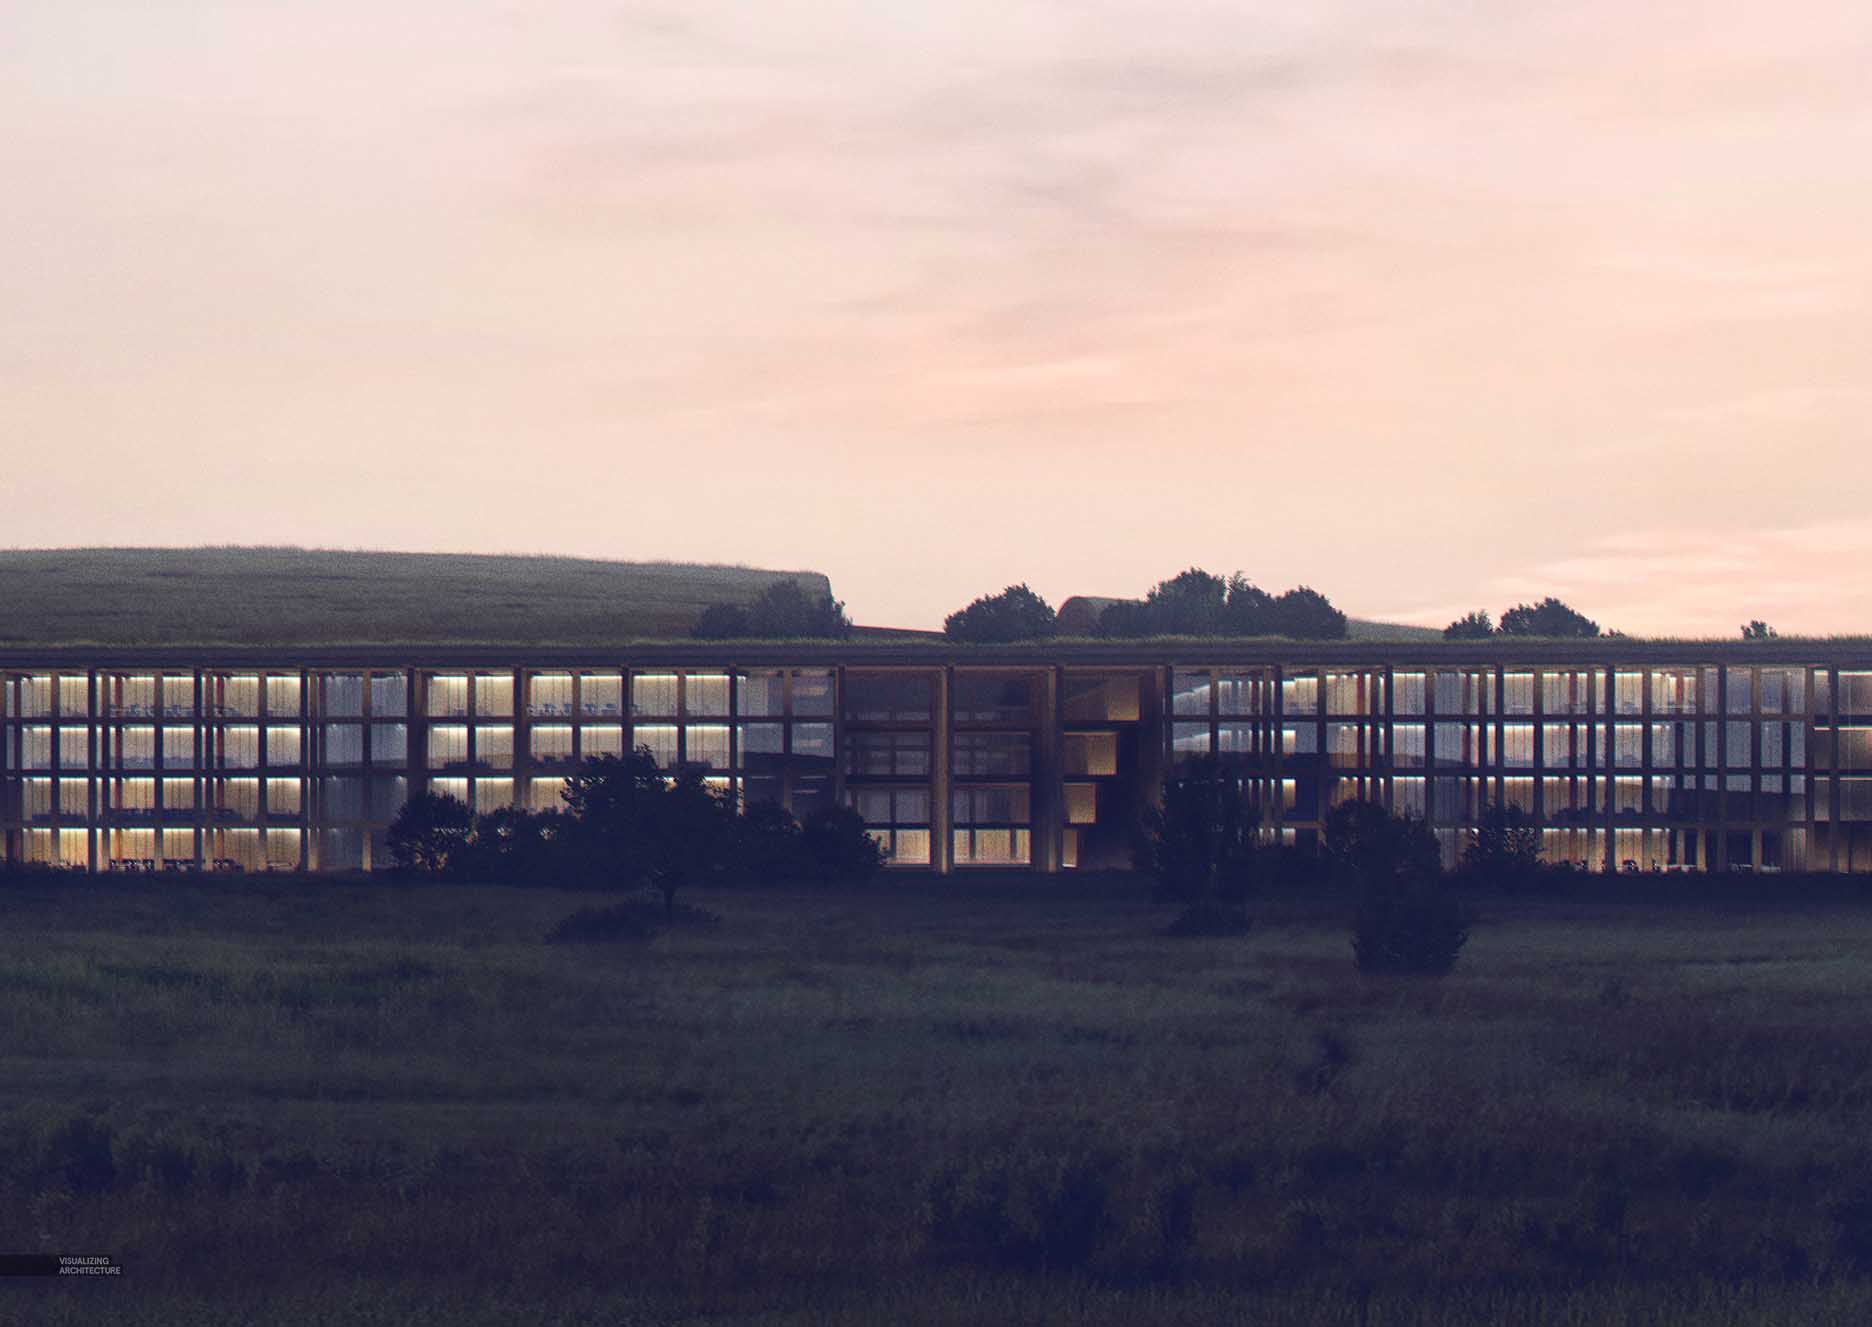
I don’t often discuss in detail how I tone images because the process ranges so much from image to image. Daytime images use different techniques compared to overcast images or dusky images. On top of that, sometimes I am in the mood to really experiment with color grading while other times I keep things subtle. However, a trend I have been noticing with my work is that my techniques for toning and creating atmospheric effects are becoming less and less complicated. It used to be adjustment layers on top of adjustment layers with many additional layers of fog and Topaz filters. The simplification of my technique is in part because I am realizing that the underlying image prior to toning needs to be setup in such a way to properly accept the toning. For example, in this image, I had to really darken parts of the illustration so that the color grading on top would read properly. For this latest image, I had an idea in my head of where I wanted it to end up, which meant taking things darker than I normally do. I was going for really deep contrast that silhouetted the building and ground plane against the sky, interior lights, and meandering stream. The final color grading really shifted the tones of the image at the end, but each step was subtle and built off of one another to get the big effect at the end. Below is a break down of this process.
1. Toning the Grass
Prairie Grass Before DarkeningPrairie Grass Levels Adjustment
I am first showing the the grass before it was darkened. The grass is made up of four or five different textures and toned to have a similar desaturated grayish green. Once I had the textures stitched together, I needed to darken the grass significantly. I did this in two steps. First, I adjusted the levels to punch up the contrast and to deepen the shadows. In some cases, the darker parts of the grass started to lose some of the detail in the shadows.
Solid Blue LayerSolid Blue Layer Set to “Multiply” Over Prairie Grass
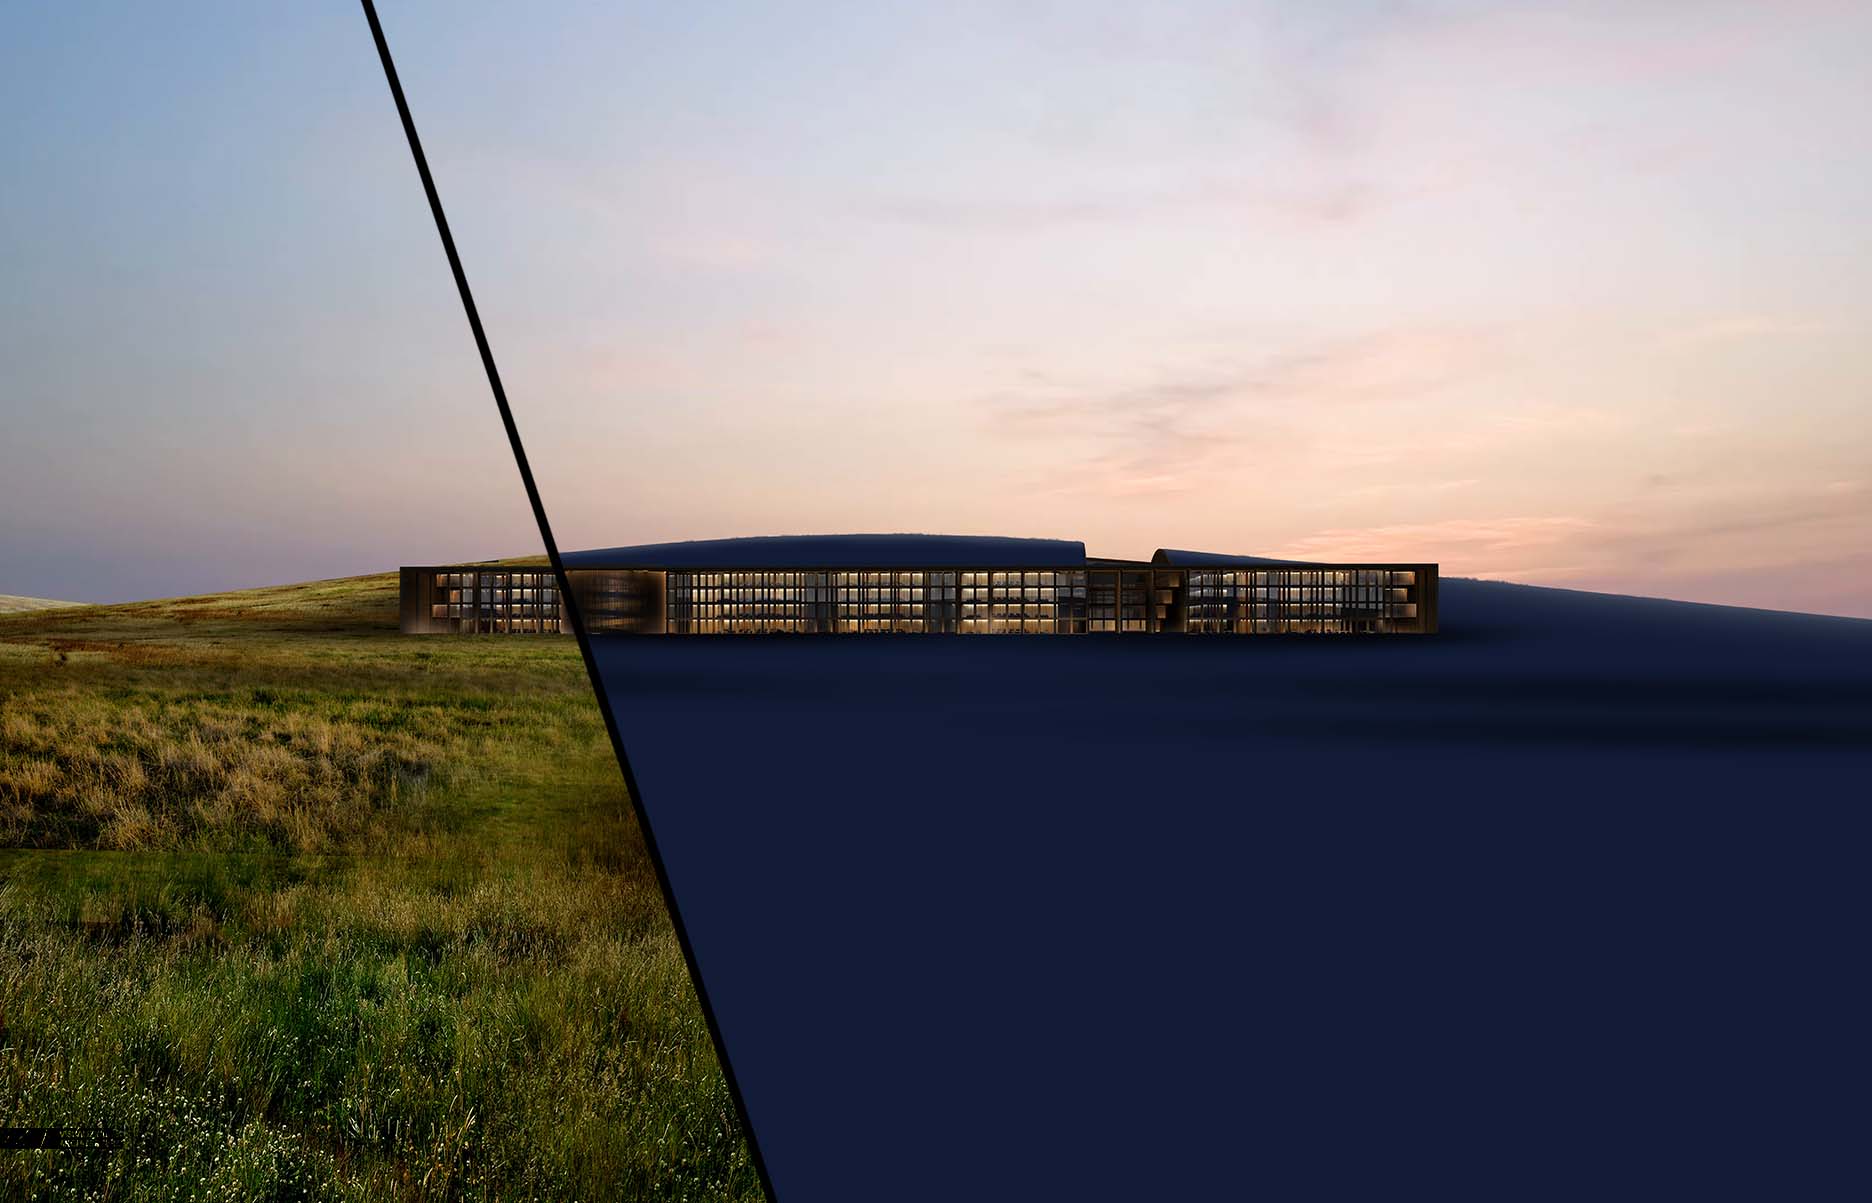
Next, I wanted to evenly darken the grass while giving it a subtle blue tint. My favorite way to do this is by creating a new layer, painting it a dark blue, and setting the Layer Blend Mode to “Multiply”.
2. Additional Details
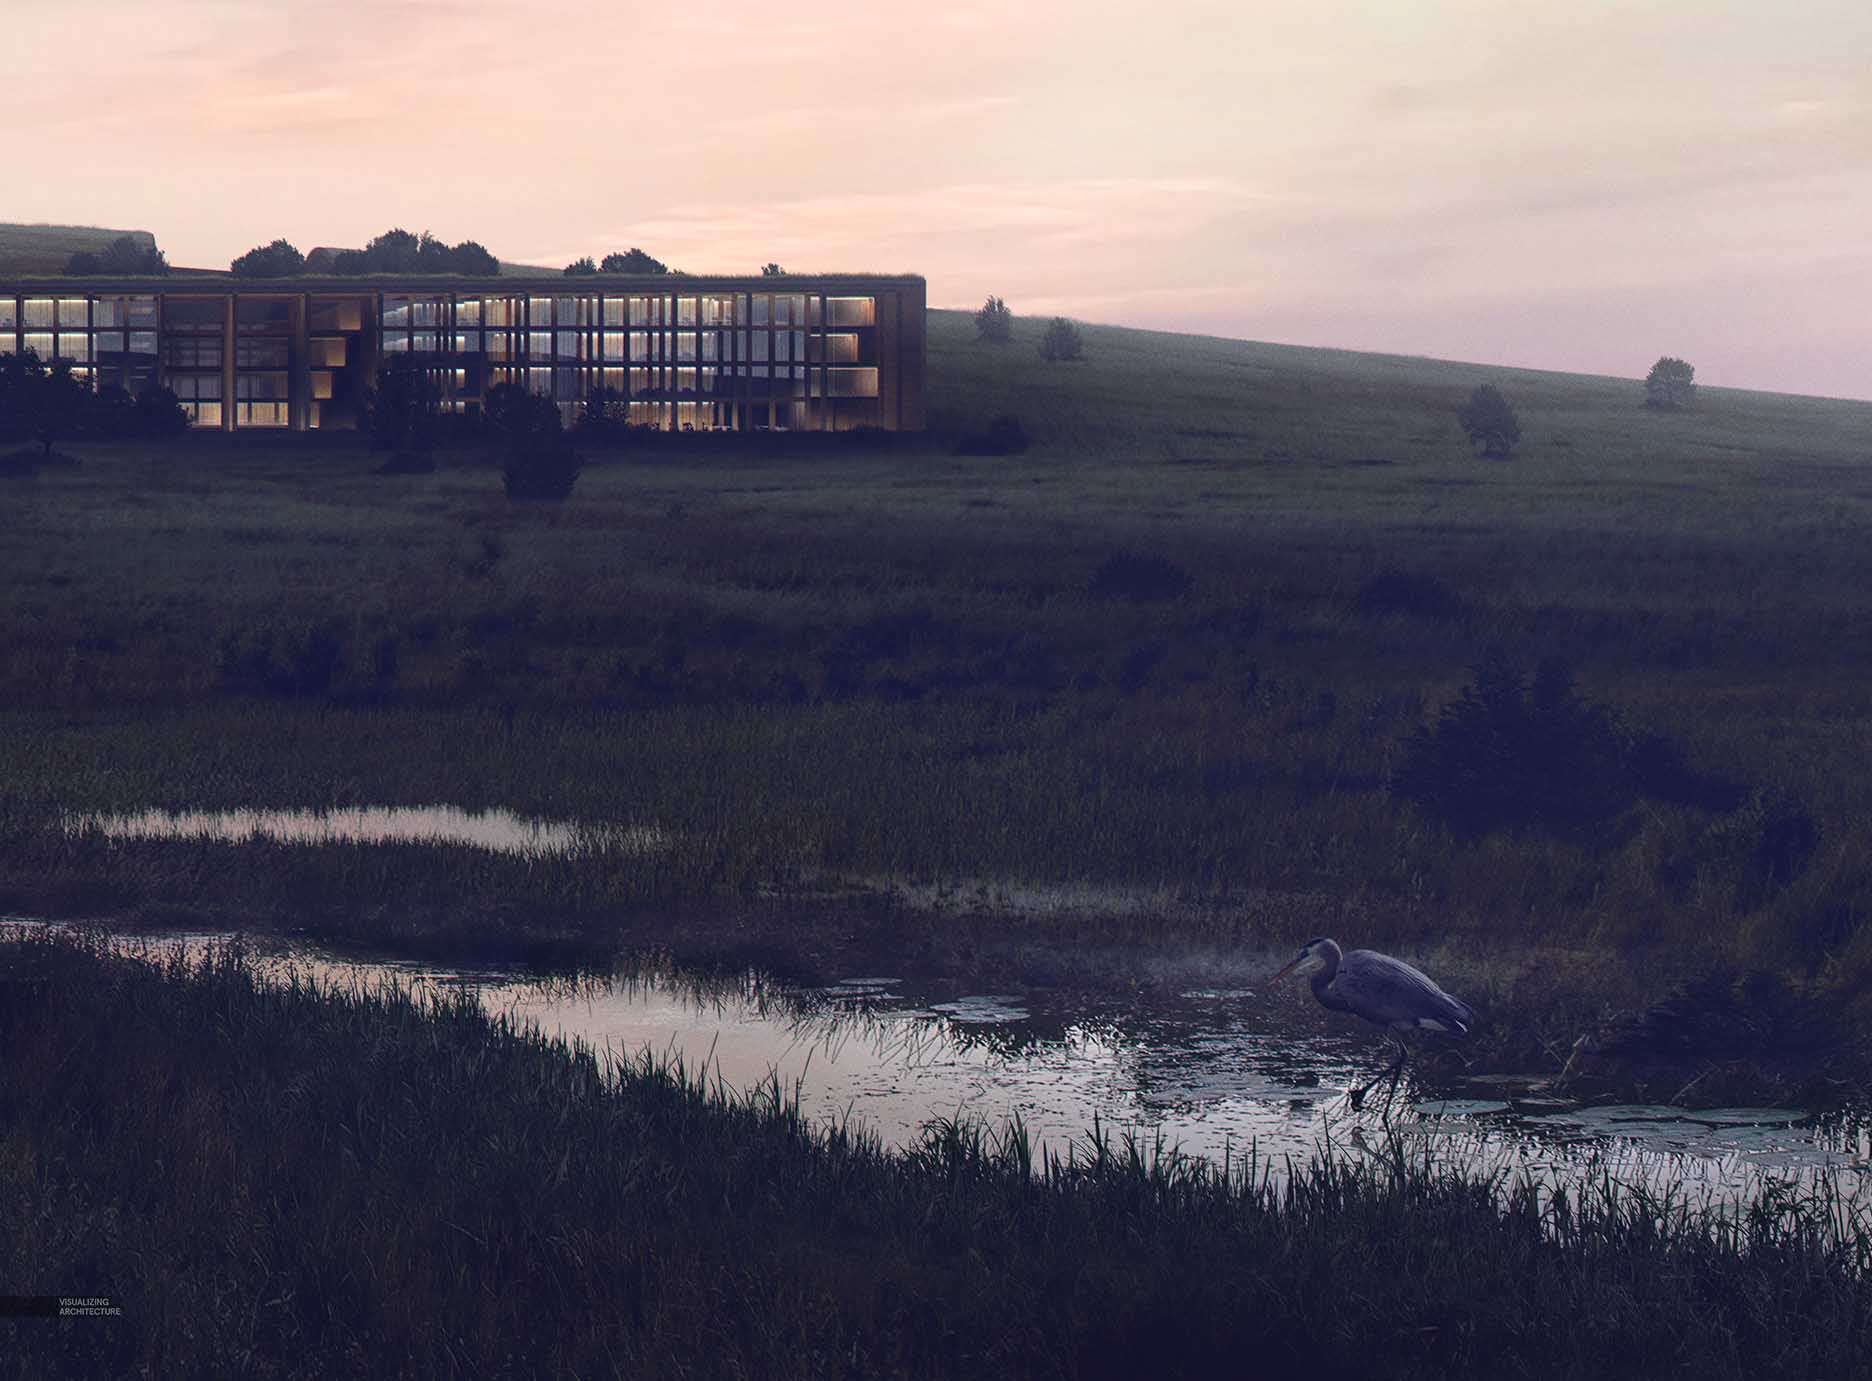
Addition of Trees and Stream
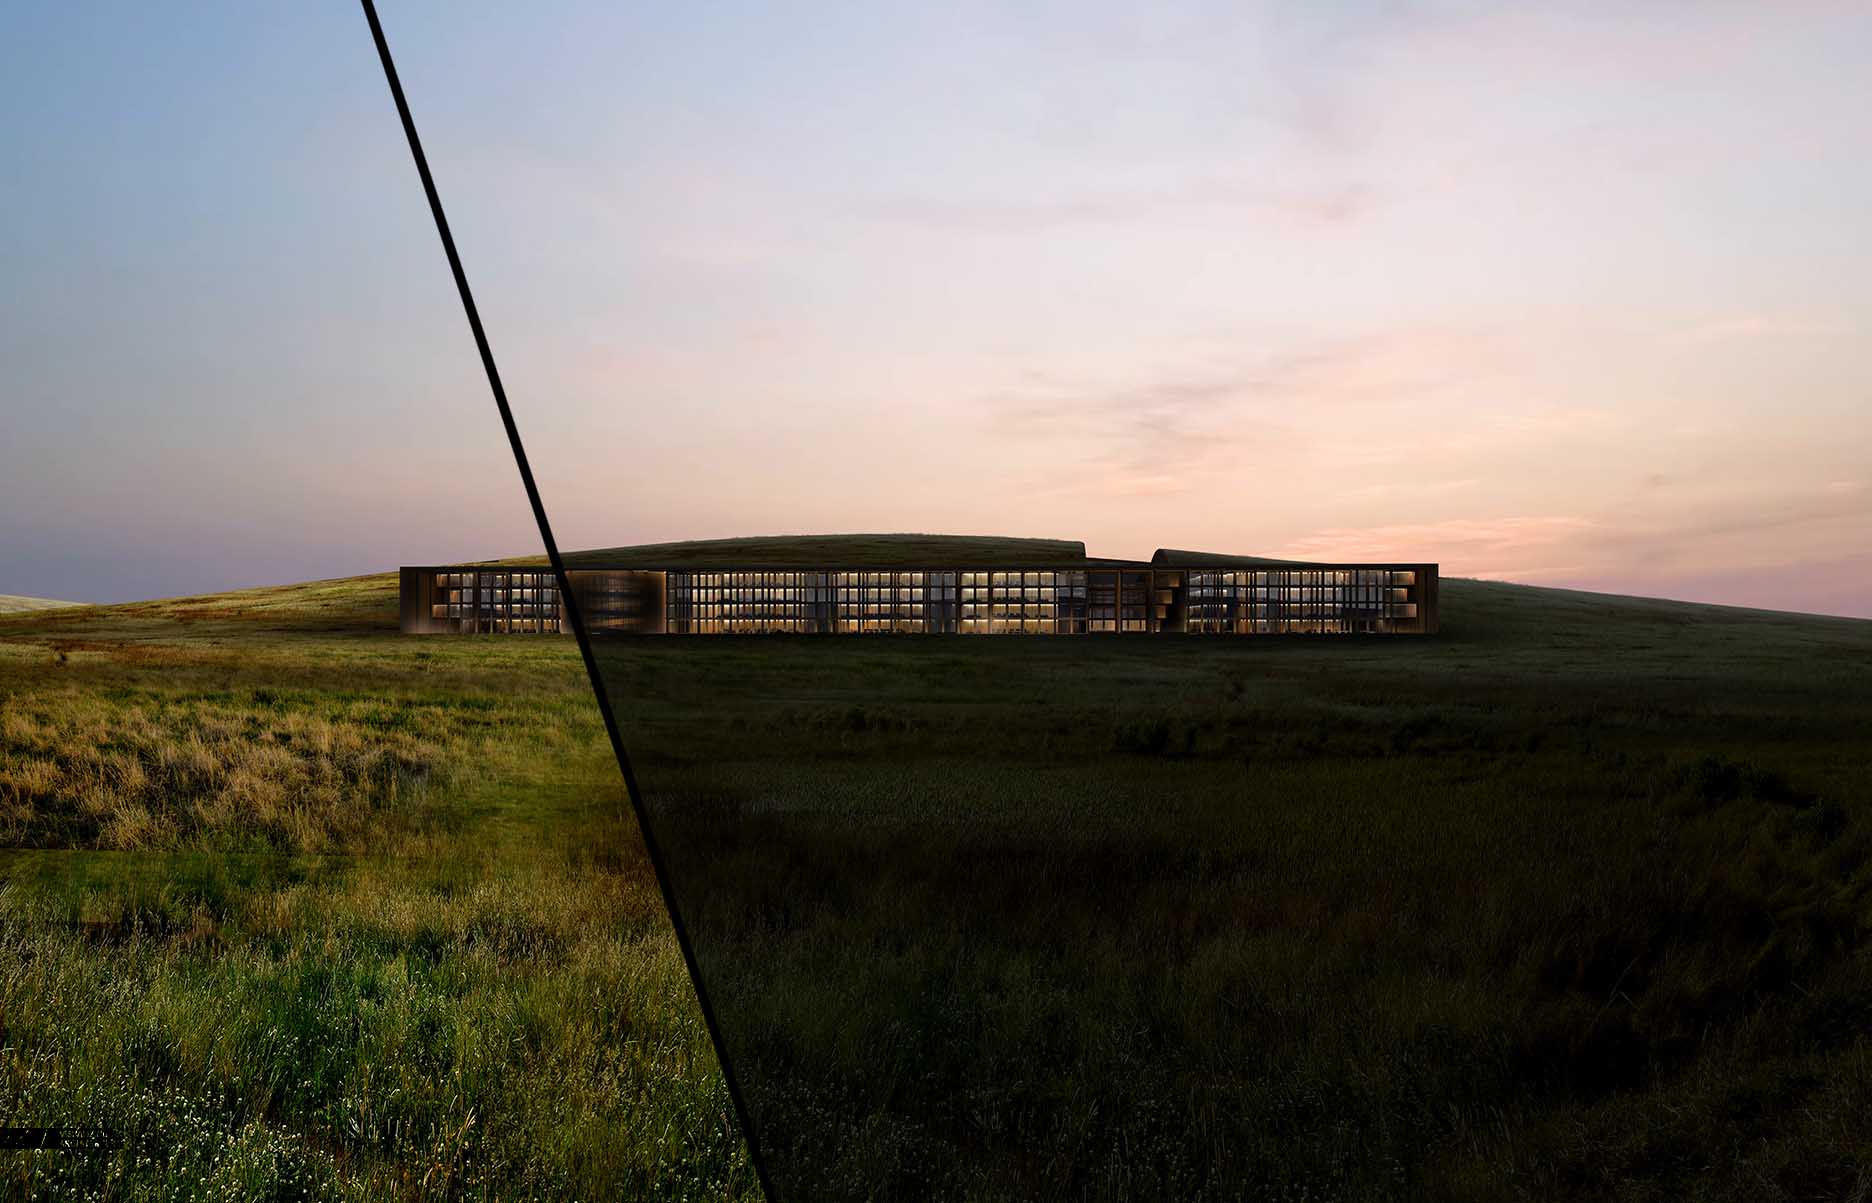
I added in lots of trees and a stream cutting across the image. In both cases, they are either shifting really dark or really light continuing the extreme contrast. For the water, I setup a mask and simply flipped the sky so that the water reflected the exact same tones.
3. Final Adjustments
Solid Blue LayerSolid Blue Layer Set to “Screen”
Now that I have the base image where I want it, I can begin setting up the final color adjustments. Up until this point, the toning was happening on an elemental basis meaning I was toning the trees, grass, building, and sky separately. These next round of adjustments will be happening at the top of the layer stack and effecting the entire image. I first wanted to lightly wash the image and push the pure black shadows to something a little more blue in tone. I did this by creating a layer, painting it a dark blue, and setting the Layer Blend Mode to “Screen”. I then tweaked the opacity of the layer to reduce the strength of the effect.
Solid Blue LayerSolid Blue Layer Set to “Lighten”
Next, I copied that same blue layer, but this time, set the Layer Blend Mode to “Lighten”. The change is subtle and both “Screen” and “Lighten” are softening the shadows of the image. The difference is “Lighten” effects only the darkest parts of the image whereas “Screen” is effecting both the dark and light parts of the image.
Color Balance Adjustments
I wanted to move away from the grass feeling too green, so I next adjusted the “Color Balance”. With the “Color Balance” dialogue box open, I first selected the “Highlights” in the “Tone” drop-down menu. I pushed the highlights of the image to a cooler blue tone by moving the “Cyan” slider to the left. I then chose the “Shadows” in the “Tone” drop-down menu. With the shadows, I didn’t want to lose all of the warmth, so I stayed in the purple ranges by pushing the “Cyan” and “Yellow” sliders to the right. I should point out this took some testing and experimenting before arriving at to these final settings.
Haze Layer IsolatedImage with Haze Applied
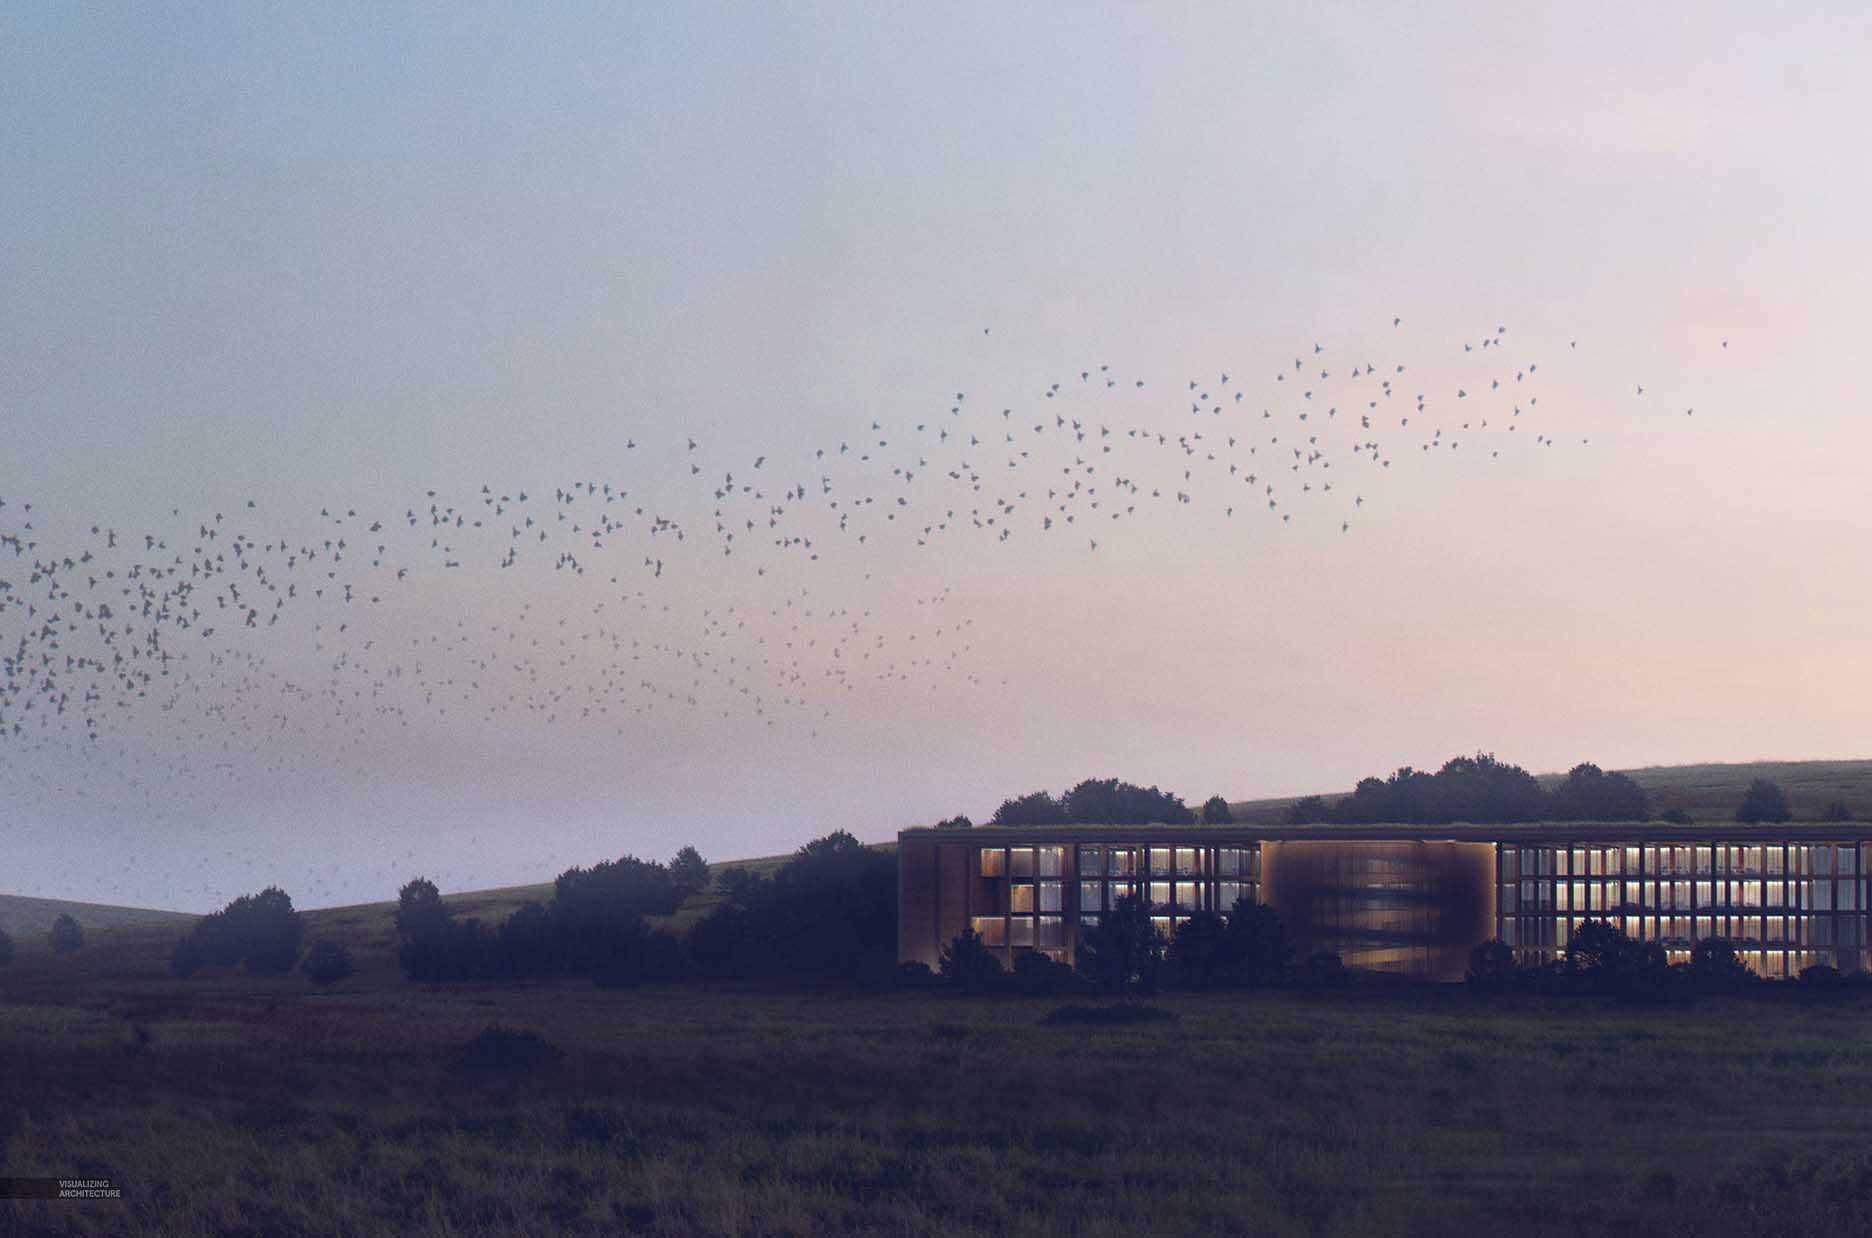
Finally, the transition from the hill to the sky was a little to harsh, so I painted in some haze that focused on the horizon, and softly washing the entire image.
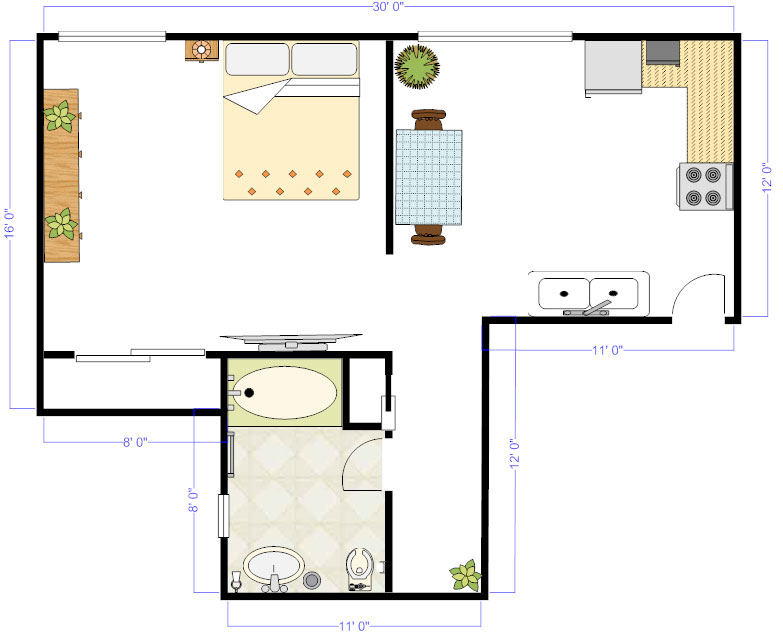
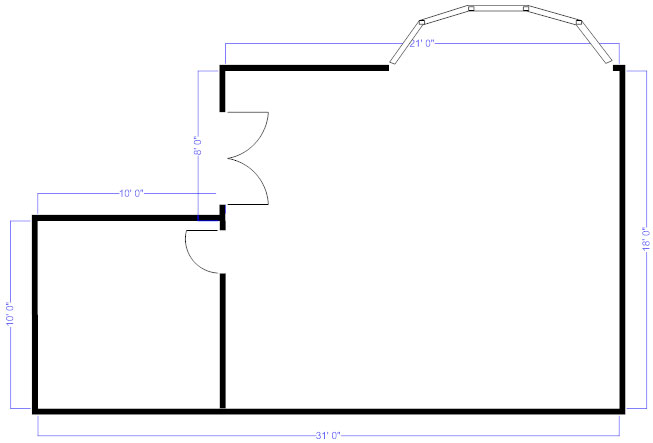
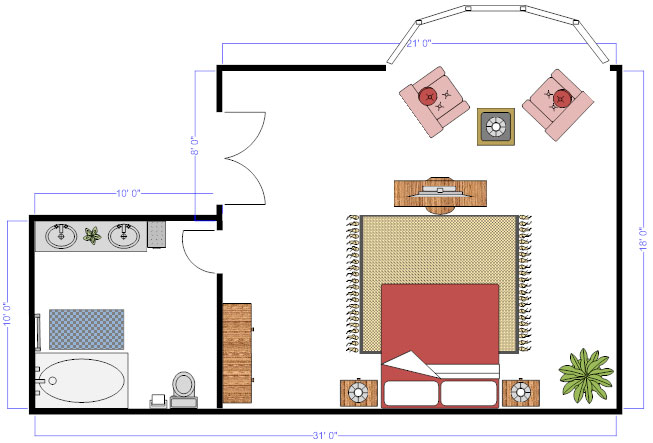
Hlo friends, here i am providing you 30 by 30 2bhk house plan with 3d interior but if you want to make your own house design plan and want some ideas then you are on the right place. this is the platform where you will not only find different types of house plan ideas with drawings but you will also learn that how to make your own plan and 3d model with your own hands. here you will find different types of tutorials from basic to advance level house designing.
once you learn that how to design a house with good 3d views then you can also earn a lot of money by this. because in market there is a great demand of housing architecture. here you can also learn 3d modeling in an easy way. if you want to know that how to make 3d model of a house then you can refer my previous blog.
so here is your 30 by 30 house plan idea. if you want a complete detailed drawing then comment please.
these are 3d views of plan if you want to watch this in more detail then watch its animation below
when we make a clone or copy of any object or structure in 3d form, it is called 3d modeling . it can be done with any software, there are many softwares for it , i will discuss these now.
3D modeling is a technique in computer graphics for producing a 3D digital representation of any object or surface.An artist uses special software to manipulate points in virtual space(called vertices) to form a mesh: a collection of vertices that form an object.
These 3D objects can be generated automatically or created manually by deforming the mesh, or otherwise manipulating vertices.
WHERE IT IS USED?
3D models are used for a variety of mediums including video games, movies, architecture, illustration, engineering, and commercial advertising.
The 3D modeling process produces a digital object capable of being fully animated, making it an essential process for character animation and special effects.
HOW 3d MODELING WORKS?
An artist usually begins by generating some type of primitivelike a cube, sphere, or plane. The primitive is just a starting shape to begin modeling. The artist will build upon this basic form and manipulate it using various modeling tools. For 3D modeling it’s almost always a good idea to start simple and work towards complexity. For example you can watch the video provided below.
SOFTWARES USED FOR 3D MODELING?
MAYA
01. Maya
An industrial-strength powerhouse, with a price to match
Cost: £222/month, £1,782/year | Pricing model: Subscription | OS: Window 7 & 10; Apple macOS 10.11.x and above; Linux Red Hat Enterprise Linux 7.3 and 7.5; Linux CentOS 7.3 and 7.5
1) Incredibly powerful
2) Comprehensive toolset
3) Expensive
4) Difficult to learn
Ask any 3D artist to name the best 3D modelling software, and most will choose Autodesk Maya. Largely seen as the industry standard for CG, Autodesk Maya boasts an unrivalled range of tools and features. This hugely extensible app isn't for the faint-hearted: its toolset is hugely complex and takes time to learn. However, if you’re aiming to get a job in the animation or VFX industries, you’d be wise to use the same software that the likes of ILM, Pixar, DNEG and Framestore use.
Maya is great at modelling, texturing, lighting and rendering – its vast feature set includes particles, hair, solid body physics, cloth, fluid simulations and character animation. There’s a chance you may never touch some of its functionality, so you need to decide if it’s actually overkill for your specific needs.
This level of power also comes at a price – a subscription to Maya doesn't come cheap. But for those who have the time, skill and patience to master it, Maya has some of the best 3D tools around and is a sound investment.
HOUDINI
02. Houdini 17.5
The procedural power behind today’s movie and TV VFX
Cost: $4,495/yr (Houdini FX), $1995/yr (Core), $269/yr (Indie) | Pricing model: Perpetual and rental | OS: Windows 7 SP1 and above; macOS 10.11 and above; Linux Ubuntu 14.04+; Linux Debian 8.0+; Linux CentOS 7+; Linux Open SUSE 13.2+; Linux mint 17.3+; Linux Fedora 21+
1) Incredible VFX simulationsIndustry-leading
2) Free version
3) Complex workflow
Coming in second place in our guide to the best 3D modelling software is Houdini by SideFX. Widely used in the VFX industry for creating a range of amazing 3D imagery, Houdini's node-based procedural approach provides digital artists with an unprecedented level of power, flexibility and control. This nodal workflow isn’t to everyone’s liking, but Houdini also has more traditional tools for directly interacting with polygons on screen.
Like Maya, this level of power and non-standard workflow can be tricky to get to grips with. Fortunately, SideFX offers Houdini Apprentice, a free version of Houdini FX, which can be used by students, artists and hobbyists for personal non-commercial projects. The free version gives you access to virtually all of the features of the award-winning Houdini FX to develop your skills and for working on personal projects. The full-featured Houdini Indie also provides an affordable commercial option for small studios. See our review of Houdini 17 Banshee for more info.
CINEMA 4D
03. Cinema 4D R20
Brilliant 3D modelling software for beginners and pros alike
Cost: Prime £670, Broadcast £1,235, Visualize £1,520, Studio £2,850 | Pricing model: Perpetual and rental | OS: Windows 7 SP1 and above; macOS 10.11.6 or 10.12.4 and above
1) Hugely extensible with pluginsShallow learning curve 2) Limited features in free version 3)Expensive
Maxon’s Cinema 4D has been around for many years and is highly regarded in the worlds of motion graphics, visualisation and illustration. It’s a professional, complex piece of software, known for its overall stability and for being the CG app with the easiest learning curve.
Cinema 4D enjoys a thriving community with a huge online library of tutorials and how-tos – not to mention training site Cineversity, to which you get free membership when you buy the app or pay for the annual Maxon service agreement (MSA).
C4D’s parametric modelling toolset is generally very good, and you can add even more functionality with a range of inexpensive plugins. The latest release also introduced volumetric modelling, which is perfect if you don't have the time or skillset to create smooth solid forms.
Perpetual licenses for C4D don’t come cheap, but you can always start with Prime and upgrade over time. Check out the trial version, which gives you 42 days to experiment for free. Maxon also offers short-term and student licenses at a reduced cost.
3DS MAX
04. Autodesk 3ds Max
The best 3D modelling software for Windows users
Cost: £222/mo, £1,782/yr | Pricing model: Subscription | OS: Microsoft Windows 7 (SP1), Windows 8, Windows 8.1, and Windows 10 Professional operating system
1) Easier to learn than Maya
2) Substantial feature set
3) Windows only
4)Underwhelming updates
3ds Max is Autodesk’s PC-only 3D computer graphics program, used for TV and feature film production and for architectural and product visualisation. Like its sister software Maya, 3ds Max boasts a very robust toolset for 3D modelling, not to mention fluid simulations, hair and fur, plus character rigging and animation.
It uses both direct manipulation and procedural modelling techniques, and a huge library of different modifiers makes the modelling process easier for new or intermediate 3D artists.
3ds Max offers a professional toolset and, unsurprisingly, comes with a professional price tag. However, students can get the software for free and a trial version is also available for 30 days.
BLENDER
06. Blender 2.82a
A free, open source CG app software with professional-grade features
Cost: Free | OS: Windows Vista and above; macOS 10.12 and above; LinuxW
1) Impressive feature setFree! 2) Great community support 3) Daunting at first
For CG artists on a budget, it doesn’t get any better than Blender, the free modelling, texturing, animation and rendering app. Version 2.82a provides a modern, more consistent interface, plus high-quality viewport, real-time interactive rendering, and tons of fixes and features.
The open-source program has been around for a long time now, and subsequently has an army of artists, teachers and enthusiasts behind its continued development. It boasts a highly impressive 3D modelling and sculpting toolset, and is considered a completely viable alternative to paid modelling programs. Blender was notorious for its non-standard way of working, but 2.82a solves a lot of these issues, and so it will feel more familiar if you're moving from an existing app.
Blender is a brilliant starting point to see if 3D graphics are for you – and we have a host of fantastic Blender tutorials to get started with elsewhere on the site. Despite the non-existent price tag, it’s capable of producing images and animation that on a par with just about any other 3D modelling software on the market.
SKETCHUP
07. Sketchup
SketchUp is an intuitive 3D modeling application that lets you create and edit 2D and 3D models with a patented “Push and Pull” method. The Push and Pull tool allows designers to extrude any flat surface into 3D shapes. All you have to do is click an object and then start pulling it until you like what you see.
SketchUp is a program used for a wide range of 3D modeling projects like architectural, interior design, landscape architecture, and video game design, to name a few of its uses.
The program includes drawing layout functionality, surface rendering, and supports third-party plugins from the Extension Warehouse. The app has a wide range of applications, including in the worlds of architecture, interior design, landscaping, and video game design. Sketchup has also found success with people who want to create, share, or download 3D models for use with 3D printers.
Sketchup was created in 1999 by @Last Software. In 2006, Google acquired SketchUp after @Last Software created a plugin for Google Earth that caught the eye of the tech giant. In 2012, Trimble Navigation (now Trimble Inc.) acquired Sketchup from Google and expanded the app by launching a new website that hosts plugins and extensions.
There is 3d model of bike which i created with sketchup, given below.
Hey there, We are Blossom Themes! We are trying to provide you the new way to look and use the blogger templates. Our designers are working hard and pushing the boundaries of possibilities to widen the horizon of the regular templates and provide high quality blogger templates to all hardworking bloggers!
:strip_icc():format(webp)/building-a-career-in-architecture-524863_final-cac007c9424149318b59636bf48f24e3.png)
![350+ Interior Design Pictures [HD] | Download Free Images on Unsplash](https://images.unsplash.com/photo-1537726235470-8504e3beef77?ixlib=rb-1.2.1&ixid=eyJhcHBfaWQiOjEyMDd9&w=1000&q=80)